Sunday, 6 May 2012

POWER LINES

I'm showing work with Basketry Plus in a new exhibition, 13 AMULETS, at the Petrie Museum of Egyptian Archaeology in London.   www.ucl.ac.uk/museums/petrie

The theme of amulets and power objects is a line of enquiry I've been exploring in different ways for some time.  I made my first amulet for FULL CIRCLE, a group exhibition with Hertfordshire Basketry, in 2009.  It was a small circular form made using a five-rod spiral plait closed with a Japanese knot - the first of many.  I've always found this plait spell-binding - the rhythm and repetition of the weave enthrals the conscious mind while the twists and complexities of the emerging spiral bewitch and bewilder the subconscious.


AMULET #1 2009

An amulet is a protective charm which was often worn as piece of jewellery or kept close to the body - either held in the hand, placed in a pocket or in the folds of clothing.  My amulet was designed to be worn as a sculptural wrist piece. 

I made two related works for the same show.  One was a Hex-weave container, the other a large painted wall piece titled INCANTATION.  Willow rods, spray-painted through a letter stencil, created vertical lines of  indecipherable text.  Old dialect words are magical - their derivations obscure and their connotations enchanting. When I was little and would sometimes get a tiny splinter of wood in my finger my grandmother called it a 'spell' and she cast it out with tender care.  By a curious inversion my own spellings often result in splintered words!


INCANTATION 2009

I returned to the theme of Amulets in 2011 when I took part in the Hothouse exhibition 'Portraits in the Making' at Pitzhanger Manor Gallery and House.  In addition to NOVA, my large-scale work for the Gallery (see previous post), I proposed making a Cabinet of Curiosities for the House itself.  Amongst my collection of 'curious mathematical gems' were several amulets.


Amulets were believed to offer protection against a whole range of ills, evils, maladies and malevolent spirits.  One type, a stone with a naturally occurring hole through it, would be placed under the pillow to ward off disturbing nightmares in which the sleeper dreams they are being pinned down by a demon or witch.  The old-English word for witch is hag - hence the term hag-ridden - and the amuletic stone is thus known as a hag stone.  I once, thankfully only once, experienced such a nightmare - which is now thought to be caused by a fairly common neurological condition referred to as sleep paralysis.  The fact that there's an old-English term to denote it suggests that many others have suffered over the centuries and sought solace in a protective charm when all else failed.

I made a whole set of spiral plait hag stones, some of which were dipped in porcelain slip, fired, and thereby literally turned to stone.


Porcelain GHOST STONE

Other amulets contained porcelain letters made for me by ceramicist Rosanna Martin.  I chose porcelain for all these pieces because Chinese porcelain - once a rarity considered more precious than gold, was often housed in Cabinets of Curiosity. 


I enjoyed a bit of word play before enclosing the letters in the plaited structures and loved the way the lower case letters in particular could be laid end to end to create meandering lines reminiscent of ancient runes.  It was like being a kid again making up secret messages.  I later discovered that talismans, or written charms, derive potency from being indecipherable to the uninitiated - a curious connection with my stencilled willow Incantation. 


                                             CORAL AMULETS containing porcelain talismans 2011

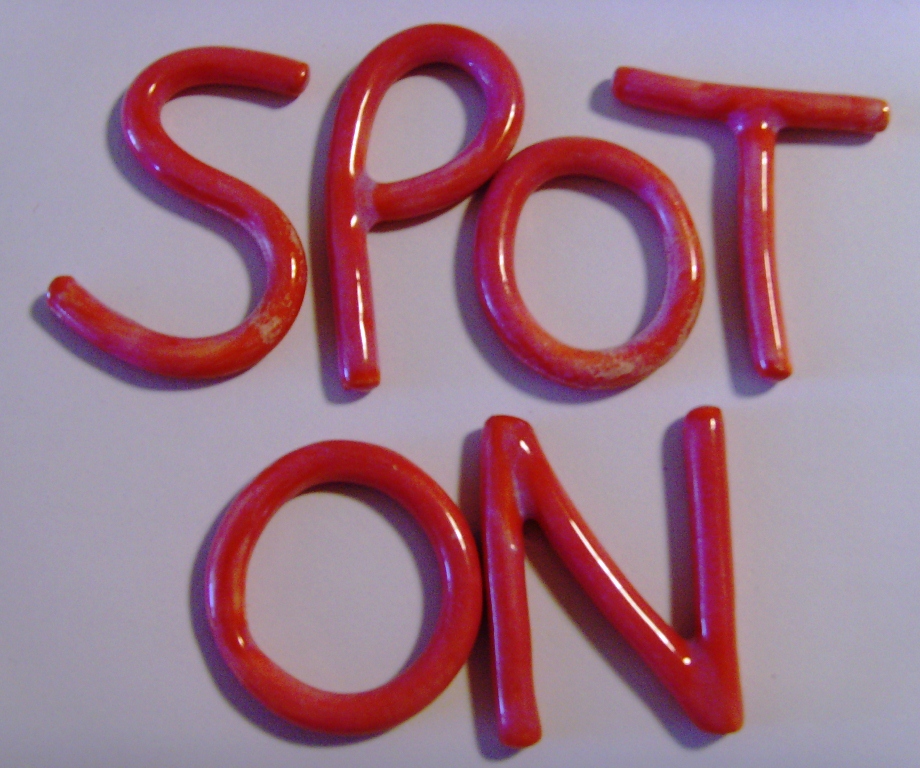
I wanted to develop the idea of making a talisman using porcelain letters as my amulet for the Petrie Exhibition.  Many Egyptian amulets in the Petrie collection were made of faience (glazed pottery) beads.  There are numerous other examples made from more precious materials such as gold, red coral and carnelian.  My talisman ONE FOR SORROW was to be a spell to ward off magpies - the human kind who would steal away our most precious jewels to feather their own nests.  Silence is golden but not if your creative voice is stifled or distorted through raucous mimicry. 


Once again I asked Rosanna Martin to make the letters and this time the porcelain was decorated with red on-glaze enamel and gold lustre.


I later discovered that talismans often took the form of acrostics - just as well because one of the four Os broke when it came out of the kiln! A happy accident which forced me to be inventive and thereby make an unplanned connection with ancient tradition.  The use of inscription as a means to ward off evil is thougth to have stemmed from the belief, in early times, of the holiness and power of words.  The title of my amulet comes from the rhyme I was taught to repeat as a child whenever I saw one or more magpies.
                       
                            One for sorrow, two for joy,
                            three for a letter, four for a boy,
                            five for silver, six for gold,
                            seven for a secret never to be told.

There are many regional variants of this rhyme which makes reference to superstitions regarding the magpie's power as a totem animal endowed with the gift of prophesy.  In our family the more usual 'three for a girl' was changed to 'three for a letter'. 


Visitors to the Petrie exhibition might well ask, 'where are the baskets?' or wonder where the connection lies between basketry and amulets.  As contemporary basket makers, several members of Basketry Plus, myself included, have moved away from making functional containers and prefer instead to experiment with basketry construction techniques as a medium for creative expression.  The weave is what connects us as a group and the power of the weave is our connection to the protective power of amulets.  As Maggie Smith, one of our group members, discovered when researching her amulet - it's basketry techniques themselves, especially those that involve the twisting and knotting of fibres, that were believed to trap evil spirits through perplexity.


The basketry element of ONE FOR SORROW - Amulet #9 of the 13 AMULETS is open hexagonal plaiting, otherwise known as hex-weave.  It both protects and obscures the talisman beneath.  I've given away only the title - there are more spellings and I defy anyone to crack the code. 

The exhibition continues until May 31st 2012. 

Here's a taster of some of the other amulets for anyone who can't make it.


Amulet #10 KEEP SAFE MY LOVE by Suni Lopez


STRANDLINE Amulet by Maggie Smith including a bag of sand to protect against witches - a witch must pause to count the grains of sand before she can enchant the weaver. (note the hagstone!)


Detail of SAFE DELIVERY - a childbirth amulet by Joyce Hicks, including a looped bag in the form of the Egyptian hieroglyph for basket.


DIVINITY - an amulet by Joan West. The form is based on the Eye of Horus - a powerful charm against the evil eye.


SEE THROUGH BLUE amulet by Norma Adams - a multilayered form containing turquoise found objects, inspired by the linen wrappings on Egyptian mummies.


Detail of UNEARTHED by Elaine Kingsford using fragments of clay pipes found on her allotment - a place of healing calm.

There will be an artists talk and demonstration at the Petrie Museum on May 10th from 6.30-7.30pm  ALL WELCOME
 
Many thanks to Debbie Challis at the Petrie Museum for all her efforts in helping put on this exhibition and for hosting the talk.


Friday, 9 March 2012

A star is born


Now that 'Practical Basketry Techniques' has taken its first steps out into the big wide world I feel I can give more space on this blog to tracing my own steps and gathering my thoughts as I move on with other projects.  I've been working on a few new lines of enquiry recently, one of which has involved picking up strands from previous work.


NOVA 2012. Photo: Sylvain Deleu
 
One of the strands is my fascination with this hyperbolic paraboloid structure.  It lends itself to different configurations and I'm always wanting to explore new variations, scales, meanings and contexts. I was surprised and thrilled to see that this image of NOVA, my 'portrait in the making' had been used in 'Crafts' magazine as an illustration for the Craft Council's director Rosie Greenlees piece on 'Craft in an Age of Change'.  Reflecting on Sylvain Deleu's image with a blurred human figure in the foreground and a glimpse of a sunlit green world in the background made me want to retrace the making process of this piece.  NOVA came from nature and is an expression of an aspect of my nature yet hangs suspended between both.

The challenge we, the 17 emerging makers from the first cohort of the Craft Council's Hothouse programme, set ourselves for the exhibition 'Portraits in the Making' at Pitzhanger Manor Gallery and House in 2011 was to respond to architect and collector John Soane's reference to Pitzhanger as 'a sort of portrait'.  We left the interpretation wide open but self-portraiture was always an option.  Each of us  started our making process by filling in the dots of an I-statement, 'I am a ...'  Making such a personal statement can be a challenge in itself.  Many makers, when writing their artist statement, feel more comfortable with the third person passive voice which allows them to stand at a slight distance from their own words and actions.  No grammatical sleight-of-hand here though, no blurring of the boundaries between the speaking subject and the self-made object.  We had to stand out in full view.

My I-statement was 'I am a ... STAR'  (my name means 'star' in Latin).  It's been a bit of a challenge all my life.  I always liked the association with the twinkly, shiny things in the night sky and even with the many different ways these objects are represented in verbal and visual imagery. The associations with stardom and celebrity were more problematic.  

But this exhibition was our opportunity to shine. 'Don't hide your light under a bushel!' the old proverb advises.  Furthermore, my lucky star was winking at me on the first site visit when we were told that it would be possible only to hang works on existing fixtures as Pitzhanger is a Grade I listed building.


There in the central domed skylight of the gallery was not only a brilliant star burst but, right in the middle, a hook!  I had my reference point.  Soane was noted for his pre-occupation with light and space that had sparked a revolution in architecture and I also had a literal hook from which to suspend a large scale structure.

I was right in the middle of making and writing up projects for 'Practical Basketry Techniques' with little time to develop a completely new line of work on the scale required.  Madeleine Furness, of the Craft Council Maker Development team has a great phrase for just such a situation - you have to 'manage your expectations'. In this case, make something that isn't overly ambitious given the time constraints .  I hadn't made a large suspended structure before but I had made several wall-hung hyperbolic paraboloids on a smaller scale.  There wouldn't be anywhere I could test a larger prototype. Getting the piece installed would require a scaffolding tower and several willing gallery assistants  - so it would have to work first time.  With the help of Vanessa Moore, the exhibitions officer, we calculated all the measurements and the buildings officer okayed the weight restrictions.  I just needed a lot of big willow.


                                               A bolt of 7' buff willow on my studio floor


300 rods and I needed 200 of the best - time to get sorting.  I also needed to straighten them.  Willow has no 'memory' -  the rods will remain straight once they have been gently coaxed into shape.  It was very time consuming - you don't need to know how many hours!  To avoid repetitive strain I worked on other smaller pieces for my 'Cabinet of Curiosities' in between straightening stints.


Then it was onto the fun bit - spray painting the rods.  Spacing them all out like this  to dry reminded me of a plantation in France I'd used as inspiration for another piece.  I love the making process - it sparks off such a myriad of connections, associations and ideas for future projects.


Then there was more sorting and choosing: this time 180 of the best painted rods.  'Choosing' is a bit of a skilled process in willow work - the eye gradually adjusts to spot the weak, cankerous or discoloured - survival of the fittest!


These are my chosen 'desire lines'.  We are star-dust - our blood contains the iron from a zillion dead stars. Had to paint them in the garden as the 4m rods wouldn't fit into the car to get them to the studio.  No time to mow the lawn last summer!


I had to return to weaving on the living room table for the same reason.  Irksome, as I was paying rent on the studio all the while.  Made me smile though when I read another maker's blog recently and she was commenting on how work produced in a domestic environment has a tendency to be domestic in scale and ambition.  An interesting point. (see www.vandacampbell.blogspot.com)


                                     All packed and ready to go - hope the van's big enough.


                                                            Just got it in with mm to spare.

                                                          
                                                                  Unwrapped on site.


                                                                    Together at last.


 I don't have insurance to climb scaffolding towers - shame!


     Emerged! A perfect fit.  At 5.50 metres high it skimmed the floor with centimetres to spare. 


NOVA - the lighter side, brighter than a thousand suns. Photo: Sylvain Deleu


The dark side - fading fast. Photo: Sylvain Deleu

The name:  NOVA  literally means 'new', or, in astrophysics refers to a nuclear fusion of hydrogen and helium on the surface of a white dwarf star causing an explosion of energy which makes it appear to shine extra brightly for a period before fading over time ...........  de stella nova.


Tuesday, 21 February 2012

PARTY LINE - book launch for 'Practical Basketry Techniques'

After a great time was had at the book signing (and selling!) on publication day at the City Lit - attended by the chair of the Basketmakers Association Bunty Ball - the Practical Basketry Techniques roadshow headed South to Creekside in Deptford for a POP-UP Basketry Exhibition and Book Launch Party at ART HUB gallery.  Hosted by myself and A&C Black (now Bloomsbury Visual Arts) the event featured work by contributors to the book and members of Basketry Plus http://www.basketryplus.org/

 
My self-styled 'super fans', super crafters Karen and Valerie from the Dyslexia Resource Unit at Deptford Green School.

All the best exhibitions open with afternoon tea and home-made cakes these days -  a trend set by Julia Mannheim of the M2 gallery in Peckham.  I opted for tea and cakes when my mathematics inspired 'Show Your Working Out' opened there in March 2010.  See http://www.m2gallery.com/

What better way to launch a basketry book than to gather together some of the contributors' baskets,  including the stunning 'Peacock Pod' by Mary Crabb as shown on the front cover, invite friends and fellow basketers - several of whom had commented on my drafts, tested 'recipes' and shared useful tips - and all get buzzy on caffeine and carbs.  After all, that's what the co-author and I had done most mornings at the local cafe when working on the projects.

 
See the recipe for a Gathering Basket in Practical Basketry Techniques
(perhaps I should introduce whoever wrote the menu to Karen and Valerie!)

One slight problem - baking not really my thing.  M2 gallery artist to the rescue.  The last show I saw there was by maker extra-ordinaire Laura Marley and she had baked the best cake ever -  Brack.  At least, I think that's what she said because when I took it out of the oven I wondered if I'd misheard.  Mine looked like a Brick.

 
TIP: don't be tempted to open the oven too soon to check if it's done - this may cause the cake to sag a bit in the middle - then it'll look even more like a house-brick. 

But it tasted absolutely fantastic and the recipe is so easy, it's the nearest baking gets to making mud pies in the garden.  Here it is for all those who've asked - only slightly tweaked from the original Bero Brack recipe. 

TEA CAKE  (NB these are imperial measures - it's an old recipe)

1 lb mixed dried fruit (I just bought a bag of mixed fruit as I like the bits of candied orange and lemon peel too but you can use a mixture of sultanas, raisins and currants - whatever)
6 oz soft brown sugar (I'm sure other sugars, such as Demerera work just as well)
5 fl oz hot strong tea (I have wondered what it would taste like with Earl Grey...)
1 large egg
8 oz self-raising flour

Method (you do have to plan ahead with this cake as the fruit needs soaking first - a bit like dried willow but not in the bath)

1) Mix together the dried fruit and sugar.  Pour over the hot tea.  Cover and leave to soak over-night.

Next day pre-heat oven to 160 degrees, 150 if fan assisted or Gas 3.

2) Beat the egg into the fruit mixture which should have plumped up nicely.

3) Stir in the flour. The mixture will resemble damp top soil - don't despair!

4) Grease and line the bottom of 2lb loaf tin with baking parchment.

5) Spoon in the mixture.  Bake for 1 and a half  to 1 and three-quarter hours until firm (or until a skewer comes out clean). 

6) Cool.  (I didn't realise at first that this was an instruction - it should perhaps read 'leave to cool'...)

But this really is the coolest, most laid-back cake recipe ever.  Apart from chocolate crispy cakes which are my usual no-bake standby.

CHOCOLATE CRISPY CAKES (the slightly healthier, grown-up version)

2 medium sized bars of dark chocolate - melted.
A few handfuls of wholewheat bran flakes - crushed very slightly.
Dark chocolate chips - as many as you like.

Method
Mix bran flakes and chocolate chips into the melted chocolate until all are well covered.
Spoon into individual paper baking cases (makes 12-15)
Cool!

I confess that, flushed with the success of the Brack, I did also go on to make Coffee and Walnut Cake and  scones.  Everyone told me they were delicious.  I wouldn't know as I was so busy signing books that by the time I'd sold out all the cake had gone.  Never under-estimate the art/craft-loving public's capacity to consume cake!  They seem to be rather fond of basketry books too.

 
A party celebration - sharing food with friends -  is a fitting way to mark the publication of a new basketry book.  Basketry has a long association with the gift of food, so fundamental to human social activity, and gift baskets were often made to mark significant rites of passage such as births, marriages and deaths. 

 
Cool-spotting: isn't that an-magazine's #1 blogger - artist Kate Murdoch?

I've had some lovely emails giving feedback on the book:

'A good looking, good natured book ...',
'It's much bigger than I expected ...'
'The book is splendid, very clear, excellent photos ...', 
'I must say I had not expected it to be so large ...'
'It looks very fresh and lovely and has a nice tone ...'
'I was reading your book in the early hours of the morning and have resolved to make a wound core object  ...'
'It's a big book Stella!'

They say you shouldn't judge a book by its cover - I'm so glad this one isn't judged solely by its size!

Sunday, 12 February 2012

GIRL'S OWN STORY

I really enjoyed myself last week setting up a showcase at the City Lit to publicise the book signing I'll be doing there on Thursday 16th, 1-2pm, Room 414, Fourth Floor.  It took me longer than expected as I had so much interest from people coming up and asking questions while I was doing it.  It was great to have the opportunity to talk about the book and the range of basketry courses on offer at the City Lit.

                                             It took longer than expected to clean the glass too!

I'd spent time in the studio beforehand making some plaited pieces from the final set of book proofs.  They were printed on such good quality glossy paper that it seemed a shame not to use them.  What better use than to make basketry to show some of the techniques illustrated in the book.  I did include a few extra plaited items that are not in the book just because I love plaiting.

I'll be making more of the bead-like balls.  So satisfying to make and I love the riot of colours. 

The red stake and strand basket was a prototype that I made in 2003 for the final show of the Part One City and Guilds Basketry course  that I began in 2001.  Most of my other show pieces were non-functional as I'd spent much of the course trying to avoid making actual baskets.  But after several sessions having to make a dyed centre cane shopping basket to someone else's recipe I decided to design one of my own.  I love vintage baskets from the 1940s and 1950s and the interwoven wavy-line design was inspired by one in my collection. 

Here it is with proof pages from the book temporarily woven through it.  It just the right size for a City Lit prospectus - or a copy of Practical Basketry Techniques! 

It's something of a contradiction that I ended up writing basketry 'recipes' for the book (traditionally, the instructions for making baskets were known as recipes). Following a recipe for someone else's design is just one way to learn the basic techniques but not the only one.  It is quite a useful discipline though to record the materials, the techniques and the making process along with what works and what doesn't even if it doesn't end up as precise recipe.  I got several commissions for this one in different colours so was glad I'd kept a record.

Actually, here's a confession, I've never been very good at following recipes be it for baking cakes, knitting or crocheting sweaters or sewing-up a dress pattern.  I've always preferred to make my own designs - sometimes with 'interesting' results.  There's a world of difference though between a happy accident that leads to a delicious creative breakthrough  and a disastrous, half-baked innovation that gives you indigestion - my attempts at free-form baking tending to veer towards the latter!  Making mud pies in the garden was always more my thing.

In the book we demonstrate a range of basic construction techniques that can easily be adapted  to different materials, forms and functions.  These techniques and the tips for working with them are just the starting point.  Some people are of the view that too much emphasis on technique, particularly good technique, can stifle individual creativity, freedom of expression and innovation.  Not so.  A desire for creativity will always seek and find expression - techniques are just a means to an end and the more help you can get from those who have been there before the quicker you can get along and do your own thing. 

That's why the City Lit is such a great place for Adult Learning.  Fantastic tutors, a supportive environment with an ethos that nurtures and encourages creativity and lots of lovely, friendly fellow students.  For me this book signing event will be like coming home - to say thankyou. 

Monday, 30 January 2012

TIME LINES

 
One of my favourite materials - red dogwood (Cornus alba Sibirica) - it warms the heart on a wintry day.

It's been great to spend time in the studio this mild and sunny winter.  The heater's been serviced and it's quite toasty at times.  Very different from last year's bitterly cold snap when, apart from a few chilly forays into the local park taking photos for the materials chapter, I spent most of my time at home on the lap-top researching and writing the text for 'Practical Basketry Techniques'.

Now, with publication  less than three weeks away, I've been busy sorting out work for a showcase at the City Lit  - the centre for adult learning where I did most of my basketry training.  The Visual Arts and Publicity Departments there have been wonderfully supportive and, in addition to the showcase, have invited me to do a book signing session on the actual day of publication, Thursday 16th February. They'll also be running a fun competition to win a copy of the book - kindly donated by the publishers A&C Black.  More on this later.  If you're reading this after 6th Feb. you might be searching for the winning answer.  Read on ...

It's all got me thinking about my time at the City Lit and what a life-changing experience it was for me.  I started my two year City and Guilds in Creative Basketry in September 2001 - just days before the catastrophic events of 9/11.  Who can ever forget what they were doing on that day. 

The Part One City and Guilds was a highly structured course which, in addition to introducing all the major traditional basketry techniques; coiling, twining, stake-and-strand, plaiting and looping, also focused in depth on three commonly used  materials - willow, cane (rattan) and rush.  We were encouraged, however, to use as wide a range of materials as possible and to experiment with and combine them freely.  We were fortunate in having gifted and inspiring tutors, including Mary Butcher, Joanne Gilmour, Shuna Rendel and Polly Pollock, who also had their own contemporary basketry practices.


Contemporary basketry by Mary Butcher.  Illustrated in 'Practical Basketry Techniques'. Photo: Jacqui Hurst

An equally important aspect of the course was the research for Prepared Working Designs.  Several of my fellow students questioned the relevance of the design element, especially as we started with a hefty six week design block.  While others were champing at the bit, desperate to get their hands on a basket, I was loving it.  Looking back, for me, this was the perfect way to begin the course as it re-connected me with drawing and mark-making in the widest sense.  There was no insistence on an end product - personal research, experimentation and exploration were the key concepts.  On the first day I sat across a table from Daniel who was doing post-gratuate studies in Fine Art at the Prince's School - moonlighting in basketry!  We giggled like two messy kids on the naughty table as we revelled in all the cutting out, sticking and colouring in.

When I did finally get to make my first basket  though (an open weave, bias-plaited container) I almost cried for joy. Suddenly every other thing I'd ever done, including studying sculpture at art college after leaving school, made sense and it felt as if at last I fitted my skin. 


Painted and Plaited spun paper (with hex-weave, bias plait and windmill plait) - not quite my first basket but it uses similar techniques and the 'loose ends' came to be a feature of many subsequent pieces 


A re-configurable willow piece  from my Part One final project using buff and brown willow, plastic washing line and spray paint.  Not so much loose ends as an absence of traditional bases and borders.


Painted and bias plaited paper baskets from my Part One final show - illustrated in 'Practical Basketry Techniques'.


When that course finished in 2003 I had to wait another two years until 2005 before I could begin the 'Level 3 City and Guilds Diploma in Design and Craft (Constructed Textiles) in the context of Basket Making' - a bit of a mouthful - we just called it Part Two!  In the meantime I'd been developing and exhibiting my own contemporary basketry.  The diploma course introduced more advanced techniques such as twill plaiting, mad-weave (so-called because it's so complex it drives you crazy!), complex linking, square willow work and ever more tortuous borders, fixtures and fittings.  There was more research and writing too in the form of a Research for Design Project and an Illustrated Study on an aspect of traditional basketry.  I chose as my topic the painted, twined basketry of the Yanomami women of the Amazon rain forest. 

I'd begun to paint on my materials on Part One - spray paint being my favourite medium for its immediacy and quick drying properties.  There was indignation from some fellow students when I spray painted buff willow for one of my final project pieces (see above).  It was as if I'd desecrated hallowed ground.  Why would one want to hide the natural beauty of the  material?  A question I continually ask of myself with differing answers depending on what I'm making.
 

Details of stencilled willow - the bright orange is the natural colour of a variety of Salix alba grown organically by Lois Walpole. 

I continued to develop and experiment with surface mark-making all the way through the course.  Most of the drawing or painting included text or notation of one kind or another - mostly barely decipherable writing or lettering but sometimes numerals and abstract symbols.


TRESPASS 2007: Red and Green dogwood with painted buff willow. Photo: Trevor Springett

I studied Communication Studies in the 1980s and went on to do post graduate research in Critical Linguistics and Discourse Analysis before finally lecturing in a Social Sciences Department.  Not long before I left academia I'd ended up on a research project studying the culture and discourse of  mathematicians.  Part of my 'going native' on the ethnographic side of the project meant having to attend a whole course of lectures on abstract algebra and propositional logic in a department of Maths and Computing Sciences.  For a maths phobic like me it was like being stranded deep in an impenetrable jungle of mind-boggling incomprehensibility without access to clean water or  insect repellent.  All a far cry from basketry it might seem.  Help, I'm an artist really - get me out of here!

Blue Jewel 2011 - Spiral plait.  Photo: Ester Segarra 

But, actually, as I later found out, not so very far removed from basketry at all, as many of the plaiting techniques I encountered and took to like a duck to water have an underlying mathematical basis.  In fact several ethno-mathematicians are now studying basketry for the light it can shed on our most basic human understanding of number and geometry.  For me basketry is like a three-dimensional, geometric play-school.


Plaited vintage printed steel tape measures - I made my first one in 2003 and wore it to the private view of the Part One Final Show.


Detail of Bloom 2009 - red dogwood and cotton cord illustrated in 'Practical Basketry Techniques'

One of the forms I often return to is something I discovered by accident - just playing around with, combining and manipulating materials and techniques in an intuitive way - a hyperbolic paraboloid structure. The sub-editor of Crafts magazine worked with my cohort on the Craft Council's Hothouse Programme for emerging makers. Unfortunately for me his passion for non-Euclidean geometry was matched only by his disdain for the use of pretentious, out-dated buzzwords - such as hybridisation. 'If you must use buzzwords at least make sure they're current!'  He suggested I don't try to explain the maths of this particular structure as I clearly don't know what I'm talking about.  Fair cop! I don't.  However, my hands seem able to grasp it and my work gets no end of interest from engineers, architects and mathematicians.  The forms and techniques speak to them in a language they understand and gets them talking to me about the work rather than the other way round - which is a huge bonus.  I made an 18 feet high version for the Gallery at Pitzhanger Manor recently.  I called it NOVA (new star) partly because my name means 'star' in Latin.  We did a workshop for a group of 5-11 year olds and one seven year old budding astro-physicist, fluent in Latin, explained more about nuclear fusion on the surface of a white dwarf than anything you'd discover from Wikipedia.  So, I'll be keeping quiet about this one too. 

Nova 2011 by Stella Harding. Photo: Sylvain Deleu

Communicating ideas about ones own work can sometimes be more difficult than giving a lecture on Foucault's concept of power in five bullet points.  I like to think though, that having done the latter for a few years with some degree of success has proved a good grounding for writing clear instructions on how to do a three rod wale.  No experience wasted.  Time will tell .........